Category: Uncategorized

  • 5 Free Social Media Scheduling Tools

    Can you spend all of your time on social media? I don’t think so.

    For many years, social media has been an important part of digital marketing. Of course, just being on social media here and there isn’t enough for your business to benefit. If you want to get the most out of your social media content, you should post often and consistently.

    The process of planning ideas, writing/recording content, uploading and interacting with your audience takes a lot of time and energy. With the right tools, you can save time, create better content, and schedule posts.

    To help you with your campaigns, we put together this list of our favorite free tools for scheduling social media posts.

    1. Loomly

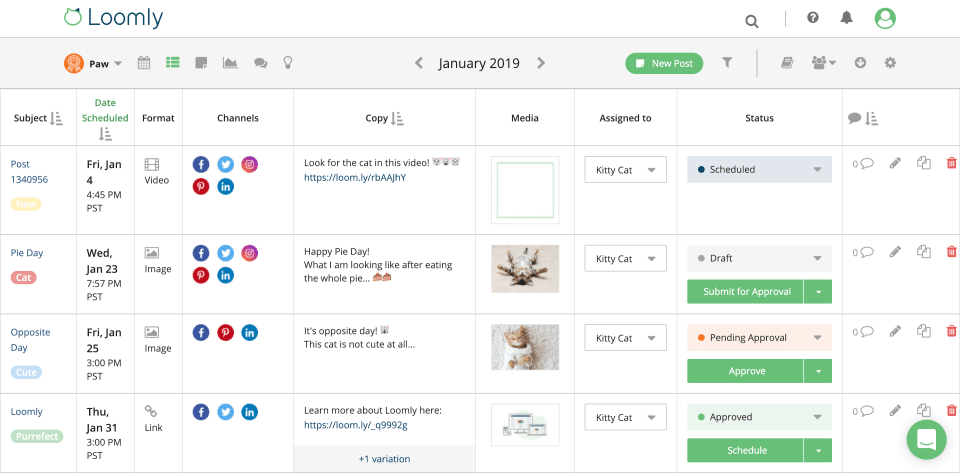
    Loomly is a cloud-based marketing tool that helps freelancers, social media influencers, and social media managers organize their social media content. Among the most important features are marketing analytics, automated publishing, keyword filtering, managing multiple accounts, and scheduling posts.

    Pros: Loomly works with Google My Business, YouTube, and Snapchat, so it’s open to everyone.

    This tool lets users handle all of their social media accounts in one place. This makes scheduling between channels easy. No matter what plan you choose, you can create and schedule as many posts as you want with Loomly.

    Cons: Users of Loomly are often disappointed that the software doesn’t let them post directly to Instagram or create Instagram stories.
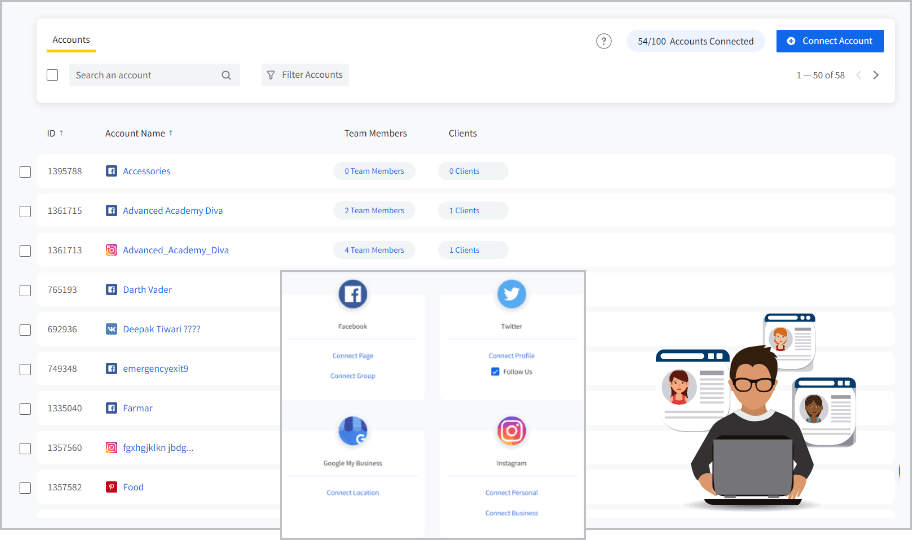
    2. AgoraPulse

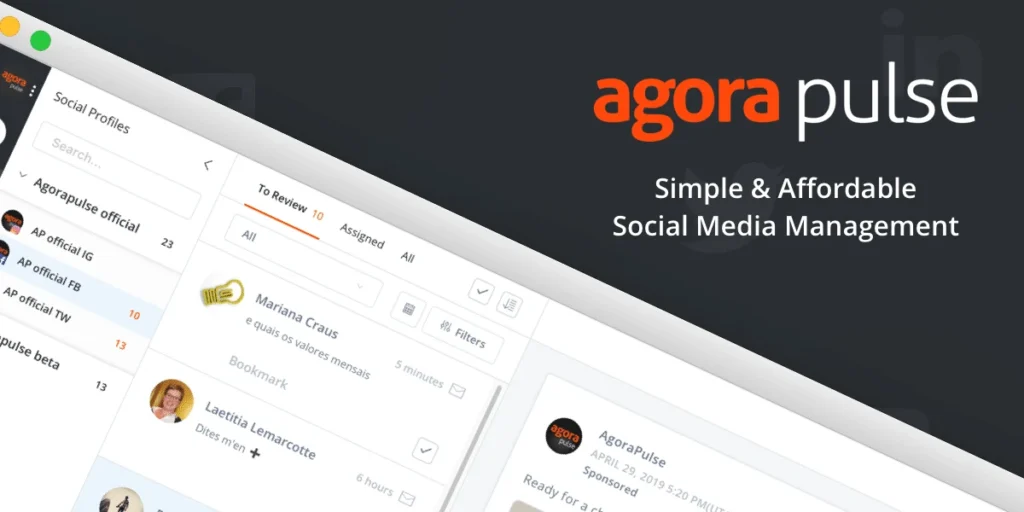
    Agorapulse is a customer relationship management and scheduling tool for social media. It works with sites like Instagram, Facebook, Twitter, LinkedIn, and YouTube. Agorapulse also lets you schedule posts in bulk, have a single inbox, and get RSS feeds.

    Pro: Agorapulse lets you tag your content so that it is easy to find and analyze it later. Using the Social Inbox, you can send messages to your clients with customized notes or comments. The built-in CRM feature helps you learn more about your audience.

    Cons: Agorapulse doesn’t have as many features as other social media sharing tools at a similar price point. It doesn’t work with some storage and integration apps such as Dropbox, Google Drive, or Zapier. The user interface for Agorapulse is not very intuitive and needs a major makeover.

    3. SocialPilot

    Teams and agencies frequently use the affordable social media scheduling tool SocialPilot.

    Increasing community engagement and simplifying daily social media tasks are both possible with SocialPilot.

    It offers a range of other powerful features that make it great for multiple types of businesses, from small businesses to marketing agencies to large corporations, and it covers basic social media functionality needs such as bulk post scheduling.

    Pros: Clients can easily understand their reports thanks to the analytics feature. During the drafting process, you can tweak individual social platform posts without affecting the rest. Using this method saves a lot of time. Contributors can create drafts that must be approved by a manager, which is a fantastic feature.

    Cons: There is a lack of analytics on Instagram. The free plan lacks some of the key functionality. The interface is a little outdated, but it is easy to use. The scheduling tool does not support drag-and-drop. Packages that cost a lot deserve more features.

    4. ContentCal

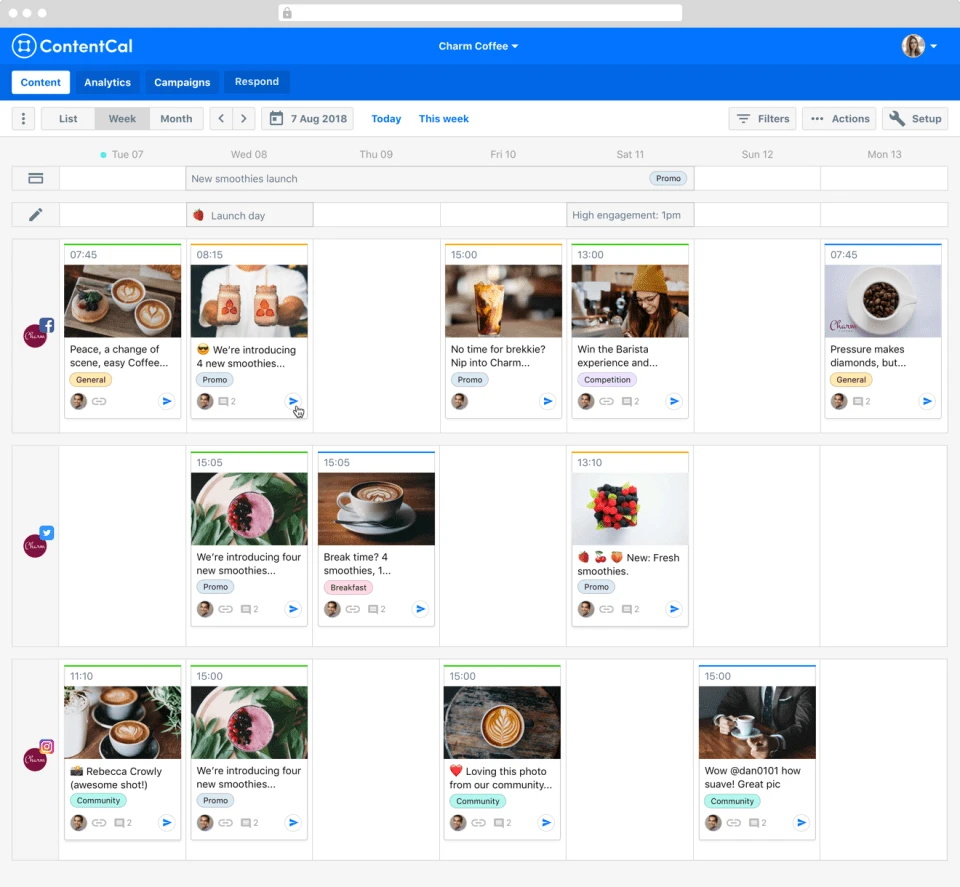
    ContentCal is a social media management platform designed to help advertising agencies plan, create, and publish content across multiple networking platforms.

    It enables businesses to quickly respond to customer queries by storing customer interactions in a centralized repository. And it works great for agencies and in-house teams.

    Pros: The platform does an excellent job of scheduling your social media posts, making it a solid choice for content marketers. Due to its intuitive interface, you’ll be able to create a productive workflow with ContentCal. Using ContentCal, you can create content drafts and approve them. Collaborating with other teams is also easy.

    Cons: There is no option for monthly billing on the lowest plan. In order to get better customer support, you need to pay more. It would be useful if additional social platforms were supported.

    5. Buffers

    Buffer is one of the more popular social media scheduling tools.

    You can publish, analyze data, engage your audience, and collaborate with your team using the platform.

    It has a free version and a streamlined dashboard that makes it easy to schedule and view your social media posts.

    Pros: One of the main advantages of Buffer is that it will be easy for you to use if you have experience with social media management tools. From one dashboard, you can create and schedule images using Buffer’s photo editor, Pablo. Since Publish and Analyze are separate features, and there are many plans within each category, pricing is very flexible.

    Cons: The buffer tool isn’t a complete solution. Posts can be scheduled and analytics can be viewed, but you cannot respond to comments and messages, engage with other people’s posts, etc. This was possible previously using a feature called Buffer Reply, but it has been removed.

    Our Verdict

    The market is flooded with social media scheduling tools, but only a handful are considered useful. In some cases, the platform’s price is too high or the platform doesn’t offer what you need, while in others, the platform’s performance is not satisfactory. We hope our analysis will give you a better idea about which tool can best meet your needs.

    Are you interested in finding more about marketing tools? Plumfind Academy has guides and tutorials you can check out. If you have any comments or questions, please do not hesitate to contact us. Let us know what you think!

    About the author(s):

    Sample avatar image. Natasha Joshi

    Natasha is our Social Media Manager, a law student, and marketing enthusiast. She loves strategizing different methods to get results. A big fan of startups and their psychological aspects. She loves to travel and interact with locals to know the history of those places. She lives in Jaipur, India.

  • The role of Marketing Communications in the success of a brand

    Imagine you have created a life-changing product. The product has the potential to make you a billionaire, but no one knows about it.

    Can you succeed without communicating the benefits of your product to your target audience?

    Certainly not. If you want to help them solve their problem and spread the word about your brand, you need to actively communicate your solution.

    Marketing communications aims to connect with your audience using messages and media. It includes advertisements, direct marketing, social media marketing, and sponsorships. Direct marketing, print advertising, TV and radio ads are traditional forms of marketing. Digital marketing, including social media marketing, boomed in the last twenty years with the advent of internet and mobile communications.

    When you are building your brand, the key is to communicate your ideas, motives, and purpose properly. If your message does not match the needs and wants of your target audience, you can end up spending a fortune on marketing and still see limited results.

    Remember, no matter which channel you are using, communication is the key!

    Let’s look at some examples.

    Example 1. We’re all familiar with one of the most commonly used forms of marketing communications: billboards or banners.

    Wherever you go, you will find it representing a new offer, the unique selling point (USP) of a brand, or how the brand is helping us solve our core problems.

    It is common for billboards to be placed along highways and in cities where there is high traffic, so they are seen by the most drivers and pedestrians.

    Advertising on billboards is a great way to build brand awareness and to get your business (or product or campaign) in front of as many people as possible.

    It is effective in gaining the attention of potential customers or at least being in front of them until the time they decide to make a sale.

    In the end, it is the intention of every business step to generate sales.

    Example 2: Content Marketing

    Content marketing is one of the key elements of digital marketing and it continues to grow at an amazing pace. It involves publishing content on a website, social media or other platforms that communicates your core message.

    In the past, small businesses have struggled to stay competitive due to the constant need for adding new content, but advances in marketing technology has greatly simplified content creation .

    If used strategically, content marketing can be one of the most profit-making efforts.

    Via good content, you can convey your brand’s message to your customers in the most straightforward way possible.

    Content can be of any kind: Blogs, Podcasts, Email, and Social Media Posts.

    Across all of these platforms, it’s important to keep your brand identity intact and your messaging well aligned.

    By blogging, creating premium content, automating marketing, and adding dynamic range to your website, you can help your potential clients learn more about you before they reach out to you.

    The creation of memorable campaigns could be one of the beneficial processes as well. A social media marketing campaign combined with email marketing and search engine optimization can produce exceptional results.

    The foundation for profitable long-term relationships is built when you stay in touch with customers, treat them as valuable connections, and invite feedback.

    Consumers rely on word-of-mouth, personal opinions, and relationships to make decisions, which makes marketing communication tools such as social media, public relations, and geolocation valuable.

    The fundamental goals behind establishing powerful communication between consumers and brands are as follows:

    • Communicate messages and ideas clearly to your target audience
    • Introduce your product to potential leads
    • Position your brand to shine against the competition
    • Improve the awareness of your product or services
    • Influence the buying decisions of your target audience
    • Create a positive brand image
    • Achieve brand recognition, trust, and transparency

    The primary interaction with your customer should begin today, regardless of the size of your business. Are you interested in finding the optimal communication strategy for your brand? Check out our guides and tutorials in Plumfind Academy. Feel free to reach out to us with your comments and questions. We’d love to hear from you!

    About the author(s):

    Sample avatar image. Natasha Joshi

    Natasha is our Social Media Manager, a law student, and marketing enthusiast. She loves strategizing different methods to get results. A big fan of startups and their psychological aspects. She loves to travel and interact with locals to know the history of those places. She lives in Jaipur, India.

  • 5 things to remember when writing a compelling search ad copy

    Paid ads can be incredibly lucrative for your business.

    Ads platform such as Google Ads, Facebook Ads, and Microsoft Ads, you can run profitable ad campaigns that can scale up your business and bring sustainable growth.

    However, you can also spend tons of money, get frustrated, and stop advertising online.

    What makes a key difference?

    Successful online marketers need to deliver the right message at the right moment.

    That’s why your ad copy can be the difference between a failed campaign and a wildly successful one.

    Simply put, a better creative message will improve the relevancy of your ads and drive more qualified clicks from your ad campaigns.

    Now let’s dive into the details and understand why ad copy is important and how you can improve it.

    Put yourself in place of your target audience for a second. People in your target audience do not see your keyword lists, bids, budgets, and other campaign settings.

    All they see is the ad copy and other elements of your ad creatives, such as image extensions, callouts, and site links.

    You compete with millions of other advertisers, just so that you can grab the attention of your prospective customers for a few seconds – that’s why attention is becoming increasingly scarce and valuable.

    So today, before you can even think about starting to sell a product or service, you need to establish a first “touchpoint” with your customers.

    Just a quick introduction to build awareness and introduce your offer. If this is not challenging enough, consider this: according to a Microsoft study, people now have an attention span of eight seconds.

    So you’ve got eight seconds or less to offer value even before anyone clicks on your ad.

    So what does a typical search ad contain?

    A standard search ad contains a heading, a short description, and a link to the offer you are making. The term “ad copy” refers to this entire combination of text, images, and other visual elements that the users see on their screens.

    Some of the key elements that you need to master:

    Headline [30 characters]: This is that eye-catching title that describes your company or product. It’s a short and sweet summary of your offer. It should ideally include your target keywords. Just like a newspaper article title, its main function is to grab attention.

    Description [90 characters]: Time to get creative! Descriptions will be the bulk of the text in your ads. You can use them to give specific details about your offer and explain why the consumers should give you a chance.

    We highly recommend trying these descriptions to the text on your landing pages. The key is to summarize your value proposition using a very short text format.

    Creative, even funny, ad copy can make a big difference, but it’s not very easy to keep it fun and informative. If in doubt, just stick to the content on your landing pages and repurpose them for your ads.

    Display URL [30 characters]: This is the URL that consumers see on your ad. It may not be the actual URL they will visit.

    Due to limited space on the ads, these are generally shortened representations of the actual link and they are used to reassure the users that the link is relevant to their search query. Make sure to test your links before launching your campaigns.

    Here are the official character limits provided by Google

    Some guidelines that you must follow always:

    There are no strict rules for writing ad copy. It’s a creative process and you can improve your skills by practice. These are the top five things to remember as you improve your writing skills.

    1. Know What Your Target Market Wants

    • The most effective way to obtain the interest of your target market is to show them that you recognize – and can solve their problems.
    • Before you start your ad copy-writing, do this exercise: put yourself in the shoes of your ideal customer.
    • Think of what sort of problem they’re experiencing, and imagine how they may search for the solution to that problem.
    • Write your ad copy as a response to that imaginary customer’s needs and search habits.

    2. Address your Target Audience

    • Make use of the words “you” and “your” in your ads.
    • Speaking to your audience directly will reassure them and make them feel really important.
    • It develops the sense that your business/services are personable – you intend to create a pleasant and helpful relationship with customers right off the bat.

    3. Match your advertisement copy to the landing web page.

    • As online marketing professionals, we understand the importance of having great landing page copy.
    • Once you start using advertisements to support your landing page, consistency between the two becomes critical.
    • Don’t assure a user of a cost-free ebook in a search advertisement if the ebook is not actually cost-free, or tease a 10-day trial when there is in reality no trial at all. Customers value consistency, and they’re more probable to believe in your product if they are confident in your offerings.

    Here’s an example of a promise made and a promise kept. Soccer.com uses a search advertisement to promote an offer: “$4.99 shipping on orders over $99”. When a user clicks on their ad, they’re taken to a landing page that displays this exact promotion. The result: increased Quality Score, but more importantly: happier customers.

    4. Split Test Your PPC Ads Frequently

    Digital marketing is part science, part art. One tested way to improve performance is to use tests and experiments in your campaigns.

    This holds true for ad copy as well. Regular testing and experiments are one of the best ways to boost campaign performance.

    Your ad accounts are full of valuable data. More data you can analyze, the more patterns you’ll detect and improve your ad strategy.

    Most ad platforms offer practical ways to run experiments and analyze results.

    Instinct can be far off the mark when it involves what will work in advertising, so it’s very important to base your decisions on data you have rather than guesswork.

    Few concepts for split tests you can try include:

    • Positioning your call to action in different targeting locations.
    • Comparing different calls to action.
    • Experimenting with different numbers and statistics in your ad copies.
    • Trying different display URLs.
    • Showing different benefits of your product or service.

    5. Learn from the competition.

    Standing out from your competition is key when creating search ads. Your search ad copy is what will differentiate your brand from others in the industry.

    It’s important to understand how your offer looks when potential customers can immediately compare it to your competition’s offers.

    No matter how optimized your campaigns maybe, if you’re not able to match the offers of your competitors, you’ll have a difficult time with conversions.

    This doesn’t need to be a one-on-one comparison of each offer your competitors are advertising. The key point is to compare your overall value proposition to all the other advertised options in the marketplace.

    Here are three search ads that come up when you Google “hotels in New York.” The latter two websites have almost the exact same ad copy, but the first result is a bit different.

    Booking.com is likely watching its competitors very closely and knows its differentiated copy is what will attract more clicks.

    It’s also very interesting to note that all three ads mention “price guarantee”.

    If you were to write the fourth ad, would you include this in your ad copy? We sure hope so.

    Conclusion:

    Pay-per-click ads are short and concise, and they contain a very limited number of characters.

    Combining different elements of your ad copy in creative and informative ways can make a big difference in your campaign’s performance metrics.

    The best copywriters have a high degree of empathy: they can think like the consumers and craft ad copy that appeals to the needs and wants of the marketplace.

    If you can also put yourself in the shoes of consumers interested in your products and services, you’re on your way to becoming an expert copywriter.

    About the author(s):

    Sample avatar image. Shivendra Rawat

    Shivendra is our Chief Marketing Officer. He has the astonishing ability to turn our client’s business objectives into well-crafted digital marketing plans. He continues to amaze us with his leadership skills and his lifestyle. Naturally, he has a mini-zoo at home consisting of three dogs, two cats, and a lizard. He lives in New Delhi, India.

    Sample avatar image. Rakshit Majumdar

    Rakshit is our lead designer. He is the creative genius behind our awesome look. He has a keen eye for design and an amazing level of patience that turns our cloudy ideas into pieces of art. He enjoys Formula 1® Racing more than most. He lives in Kolkata, India.

  • What is Google Analytics 4 and do you need to switch today?

    There’s a new kid in town when it comes to measuring web interactions. Ladies and gentlemen, please say hi to Google Analytics 4. Most of our clients wanted to know if they should switch to GA4 from Universal Analytics (we’ll just call it GA3 from now on). To help them and to help our community, we decided to prepare this guide. Now, if you’re in a huge rush, because you have to finish binge watching that show on Netflix, here’s the quick answer:

    Our recommendation: No need to rush, but you should start experimenting with GA4. Just add it to your site and let it start collecting data. It will play nicely with your current Google Analytics setup and will give you plenty of options for a privacy-obsessed future.

    For those of you who would like to learn more about GA4 and its quirky new way of measuring digital footprints, here are some more juicy details.

    Top-level summary:

    • GA4 is the latest version of Google’s analytics solution. This time, it combines tracking web and app traffic analysis.
    • In addition to a very significant change in user interface, GA4 also brings a brand new way to track user interactions on your website. Google is clearly trying to “future proof” analytics for a future where user privacy considerations may severely limit the use of some existing technologies (e.g., cookies).
    • Despite reports to the contrary, Universal Analytics (GA3) is alive and well. Google will continue to support it for many years to come.
    • Special note on e-commerce tracking: good news, you don’t have to updata all those ecommerce data layers: GA4 is compatible with the UA ecommerce schema.

    Why GA4? Why now?

    Google believes that “every company is a data company”[1] and many industry trends seem to be pointing to a data-centric world, where properly measuring user interactions will become a key competitive advantage.

    Today, properly measuring user interactions on your website (or your mobile app) is one of the keys to success in digital marketing. Google Analytics is one of the most popular tools for measurement. In October 2020, this tool got a big upgrade: Google Analytics 4 is officially here.

    GA4 is designed to collect details on your users while striking a good balance for privacy and security aspects. You can use it to track many useful pieces of data: your traffic volume, performance of your marketing channels and the trend of your key performance indicators. While there are many legitimate concerns regarding user privacy, we firmly believe that responsible collection and use of sampled data will help everyone, especially the users.

    Without reliable and consistent data, improving user experience would be a lot harder. We are happy to see that Google is taking these concerns seriously.

    In March 2020, Apple caused a major shock in the digital advertising industry with the release of their latest operating system. After this update, many Apple devices started blocking third-party cookies that are essential for advertisers to track the performance of their ad investments. We see this as a glimpse of our digital future: users gaining more control on how advertisers and tech companies track their browsing habits and interests.

    So, there is a good reason why GA4 is built around a privacy-first design philosophy and we are happy to see that Google is taking user privacy concerns more seriously. The limitations on data granularity are still firmly in place (for example, you cannot get internet protocol level data, or harvest personally identifiable information). Google also seems to be getting ready for the day when cookies will be strictly limited (or entirely banned). Google’s advanced machine learning models will replace some of the information gathered using cookies.

    So what’s new with Google Analytics 4?

    Technically, Google Analytics 4 is not just the next version of Universal Analytics (GA3). The relationship between the two is a bit like upgrading to an electric model of your favorite automobile brand: it may look a bit similar, but it’s designed with a very different technology.

    GA4 is an expanded and rebranded name for Google App + Web Analytics and it includes expanded predictive insights, deeper integration with Google Ads, cross – device measurement capabilities and more granular data controls [1]. GA4 uses the same tracking schema on both the web and app data, and this guarantees its reliability and robustness compared to what GA3 provides for cross-device and cross-platform tracking. However, GA3 has compelling attribution modeling capabilities via multi-channel funnels and attribution reports which make GA3 more powerful than GA4 in attribution modelling.

    GA4 has a default built-in IP anonymization feature while in GA3 IP anonymization is opt in. GA3 tracks the IP address to determine the geolocation of a visitor. Having IP anonymization disabled, a visitor’s IP address is sent to Google Analytics servers by dropping the last 3 IP digits. Furthermore, GA4 is designed to adapt to a future with or without cookies or identifiers. As their-party cookies are phased out, GA4 includes modelling to help fill the gaps where data is incomplete, and this goes beyond cookies [3].

    How does GA4 and GA3 (Universal Analytics) compare?

    GA4GA3 Universal Analytics
    Property IdentificationMeasurement ID with the prefix ‘G-’Tracking ID with the prefix ‘UA-’
    Measurement principleEvents focused on user interactionsSessions and hits
    Key technologyMachine learningCookies
    Primary useWebsites and appsWebsites
    User privacy considerationsCookie-less data collection; no IP addressesNo IP addresses
    User interfaceSimpler, but will probably bloat over timeSo many choices. Where was that custom report thingy again?

    For starters, we have a new naming convention for the analytics properties. GA3 uses tracking ID (beginning with letters ‘UA-’) for its hit tracking; instead, GA4 uses a measurement ID (with the prefix ‘G-’) for its event tracking. So whether or not you’re using Google Tag Manager for configuring Google Analytics, you’ll need to update the ID parameter.

    In GA3, the data measurement model is session-based (a session is a group of user interactions or “hits” on a website which take place over a given timeframe). A session can contain multiple pageviews, events and ecommerce transactions. [1]). Google Analytics 4 uses a completely different way to track user actions and its data measurement model is event-driven. GA4 captures every interaction as an event, whereas GA3 captures every interaction as a hit within a given time frame.

    In order to truly benefit from GA4, you’ll need to take a mental leap and forget about the concepts of pageviews and hits. Instead, we’ll all need to wrap our minds around the more flexible concept of events in GA4. The data in the GA4 reports is from events that are triggered as users interact with the website/app.

    More on GA4 events and how to configure them

    There are four categories of events in GA4:

    1. Automatically collected events: are collected automatically with basic data collection
    2. Enhanced measurement: are collected automatically if you have enabled enhanced measurement
    3. Recommended events: are events that you implemented yourself, but that have predefined names and parameters
    4. Custom events: are events that you name and implement yourself [2].

    If you’re a regular user of events in GA, then we’ve got some good news for you: category-action-label-value schema is fully preserved in GA4. On top of these four standard data fields, you now have the option to send additional data to GA4 by using a much more flexible setup via custom event parameters.

    So, what’s next?

    GA4 data collection makes extensive use of machine learning to plug the gap when cookies suddenly vanish (cool stuff, isn’t it?). It is not clear when or even if cookies will entirely disappear. In the meantime, why not start experimenting with GA4? You can continue to rely on GA3 for your operational reporting needs and data analysis. Adding the GA4 option today will help you future-proof your analytics stack.

    Clearly, our friends at Google are getting ready for a future when we’ll all have to live with a “less is more” approach to data collection. We just need to figure out what’s essential for our business, and structure our Google Analytics properties to measure that. And only that.

    Do you need help with setting up GA4? Instead of dealing with data layers, would you much rather focus on a triple layer chocolate cake recipe? Give us a shout. We’ll help you with anything you need when it comes to Google Analytics. And maybe you’ll send us a piece of your cake.

    Works Cited

    About the author(s):

    Sample avatar image. Oz Gurtuna

    Oz is the founder of Plumfind. He is a huge fan of permission-based marketing and an ardent believer that marketing can be a force for good. He is determined to make digital marketing accessible to all entrepreneurs around the world. He lives in Montreal, Canada.

  • How to Implement Google Tag Manager for Single-Page Application such as React

    We love single-page applications: they can be incredibly fast and offer a wonderful user experience. As developers, we love challenges, but one thing we didn’t see coming was the difficulty of Google Tag Manager with React applications. Here’s a quick guide on configuring your tags and triggers, hopefully it will save you some time. Spoiler alert: our solution is based on the “Custom Event” trigger in Google Tag Manager.

    Your step-by-step implementation guide

    Step 1: Installing GTM

    We will start with installing an essential Javascript module called “react-gtm-module”. Go to your React based app project directory; enter “npm install react-gtm-module-save” in the terminal and install the GTM module for React based apps. If you haven’t used package managers before, check out this link.

    Step 2: Configure your index.js file

    Next, you should insert the statement “import TagManager from ‘react-gtm-module’”in your “index.js” file which allows your app to initialize the Google Tag Manager module that we installed in the first step. Below the import code line insert a code snippet right above the ReactDOM.render section (as shown below) and don’t forget to replace ‘GTM-XXXXXXX’ with your own app’s GMT Container ID:

    Once you complete this step, your Google Tag Manager is able to track pageviews on all your app pages. You may say “This sounds great! We’re all done here.”, but unfortunately, this basic configuration is not enough. You still need to customize the tags and triggers for pageviews and events in your app.

    Step 3: Tracking pageviews and specific events

    The default GTM pageview trigger is fired only on page load. It won’t fire again unless you refresh the page. This is because React renders each page component separately: switching between different pages means re-rendering some of the React components, instead of reloading the whole page.

    If you would like to track all the “history” of users, please read the section on “How to track pageviews”. If you’re interested in tracking specific events, such as button or link clicks, please refer to the section on “How to track specific event(s)”.

    How to track specific event(s):

    To track a button click or a link in your app, go to your code where you add the button. In the “ onClick ” method, use the window.dataLayer.push command to send your custom event to a GTM datalayer (if you’re new to datalayers, here’s a good explanation from Google). Here’s a code snippet that can help you. Just replace ‘buyNow’or ‘button-click’ with your own event name that matches your GTM trigger configuration:

    Of course you can customize the “Category”, “Action” and “Label” fields to match your needs. we just used the button name here.

    To set up the corresponding trigger, please see below screenshot for an example:

    Again, you should customize the “Event name” field, but you need to make sure that it is identical to the event name that you added to the “onClick” method in the code snippet.

    Pro tip: “The value of the event variable in your onClick method must match the name of your GTM trigger.”

    How to track history pageviews on all pages:

    Normally, tracking pageviews is one of the easiest things to do in GTM. Add a base tag for Google Analytics, pair it with an “All Pages” trigger, and you’re done. However, React and other single-page applications require a bit more work. To track pageviews, you can use the “History Change” trigger.

    You can select any tag name you’d like, but make sure that the Google Analytics Settings variable matches the GA3 or GA4 Tracking ID of your own app project. Please note that, if you use the “All Pages” trigger, the trigger will only fire once, unless users refresh the page. That’s why we use the “History Change” trigger instead.

    To set up the corresponding trigger you can use the configuration below:

    How to track a specified page:

    To track the pageviews of specified pages, you can configure the tag and trigger in a similar way as you did to track pageviews on all pages.

    Here’s an example of the trigger configuration:

    Here we use “This trigger fires on” “Page URL” “contains” “/solar/discover” to track visit history of the page that has “/solar/discover” in the URL path. Just change the path to match the URL of a specific page on your website if you’d like the tag to fire only on that page.

    Congratulations! You now have a robust and easy way to use GTM in your single-page applications. If you found this guide useful, please share Plumfind Academy with your friends and colleagues. S ign up to our “Plum Friends” emails for more tips, guides and best practices on analytics. Thanks for reading!

    About the author(s):

    Sample avatar image. Jingfei Gao

    Jingfei is our software engineer. She can magically convert our craziest ideas into well-optimized chunks of code. Her unbounded energy and can-do attitude keep our technical teams running like a well-oiled machine. We suspect that the source of her energy is the classics: she loves opera, her favorite composer is Mozart and in another life, she could have easily been an archeologist. She lives in Montreal, Canada.

    Sample avatar image. Sasa Zhang

    Sasa is our software engineer, but she does so much more than coding. With a double major in computer science and business, she can connect all the dots and bits that lead to an amazing user experience. Software is not her only passion, mind you. She is an avid pastry chef and a keen hiker. She lives in Montreal, Canada.